Available Dispersion modellings
Note
In this section, you may find the different steps for launching the possible modellings. Be aware that prior to dispersion modelling, a meteorological simulation must be run over the period and area of interest. The results of this meteorological simulation can then be used for dispersion modelling.
Important
Reminders for launching a new scenario on SIMPAC
On the home page, create New Scenario by clicking the following icon:

Choose Simulation Name and Description
Use the advised model that corresponds to a dispersion modelling, specified at the beginning of each explanatory paragraph
Click check to create new scenario, you will be redirected to a new page

Plumes’s trajectories
While creating your scenario, use model Spray Traj.
Under the METEO tab, choose the wind field simulation scenario you wish to use as data for your dispersion modelling.
At the top of the page, check the start and end dates for your simulation.
The map on the right should shift over to the area your scenario covers.
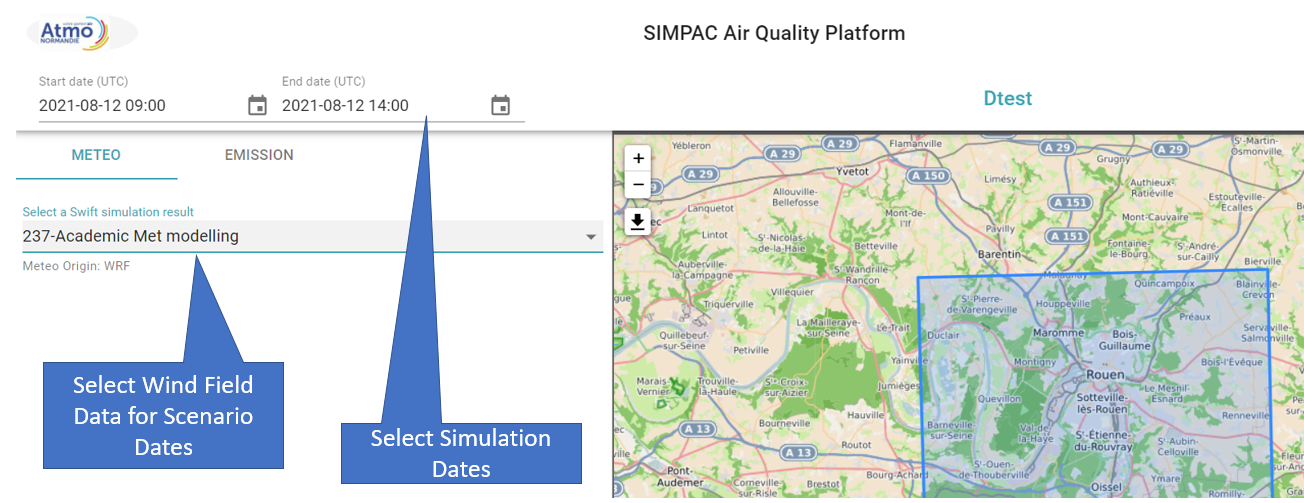
Configuring the simulation: Defining Meteorological Data for Scenario
Under the EMISSION tab, add any desired emission sources by filling out the form
Fill in an individual source name, site, height, diameter, temperature, vertical speed, emission time interval and specify the emitted species. The dispersed species is a tracer, and the emitted flow is fixed at 1kg/h.
You can enter the source location manually or by clicking on the location on the map to the right after clicking on the location field and the marker symbol.
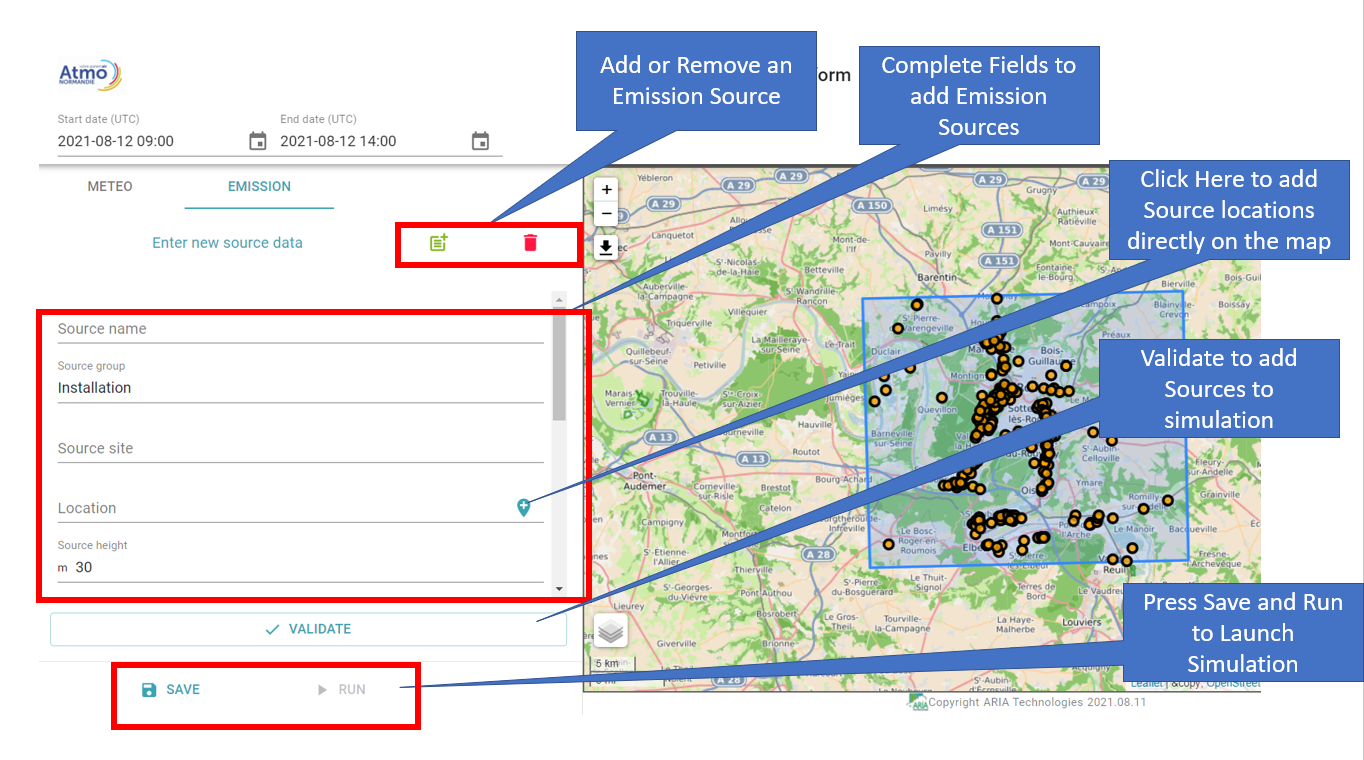
Configuring the simulation: Defining Emission Sources for Scenario
Pre-available sources are shown by yellow circles on the map to the right. To add one to the simulation, click on the source and then on ‘Add To Simulation’
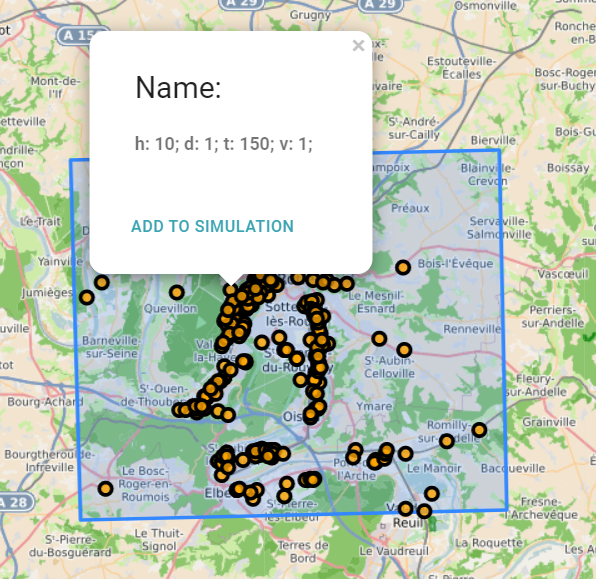
Configuring the simulation: Adding a preivously available Emission source to the Scenario
Dispersion with unitary sources
While creating your scenario, use model Spray/unit.
Under the METEO tab, choose the wind field simulation scenario you wish to use as data for your dispersion modelling.
At the top of the page, check the start and end dates for your simulation.
The map on the right should shift over to the area your scenario covers.
Configuring the simulation: Defining Meteorological Data for Scenario
Under the EMISSION tab, add any desired emission sources by filling out the form
Fill in an individual source name, site, height, diameter, temperature, vertical speed, emission time interval and specify the emitted species. The user has the choice of the dispersed species, but the emitted flow is fixed at 1kg/h.
You can enter the source location manually or by clicking on the location on the map to the right after clicking on the location field and the marker symbol.
Configuring the simulation: Defining Emission Sources for Scenario
Pre-available sources are shown by yellow circles on the map to the right. To add one to the simulation, click on the source and then on ‘Add To Simulation’
Configuring the simulation:Adding a preivously available Emission source to the Scenario
Cartography of the dispersion of pollutants
While creating your scenario, use model Spray.
Under the METEO tab, choose the wind field simulation scenario you wish to use as data for your dispersion modelling.
At the top of the page, check the start and end dates for your simulation.
The map on the right should shift over to the area your scenario covers.
Configuring the simulation: Defining Meteorological Data for Scenario
Under the EMISSION tab, add any desired emission sources by filling out the form
Fill in an individual source name, site, height, diameter, temperature, vertical speed, emission time interval and specify the emitted species. The user has the choice of the species and quantities emitted.
You can enter the source location manually or by clicking on the location on the map to the right after clicking on the location field and the marker symbol.
Configuring the simulation: Defining Emission Sources for Scenario
Pre-available sources are shown by yellow circles on the map to the right. To add one to the simulation, click on the source and then on ‘Add To Simulation’
Configuring the simulation:Adding a preivously available Emission source to the Scenario
Retro-trajectory of the pollutant plumes
While creating your scenario, use model Retro Spray Traj.
Under the METEO tab, choose the wind field simulation scenario you wish to use as data for your dispersion modelling.
At the top of the page, check the start and end dates for your simulation.
The map on the right should shift over to the area your scenario covers.
Configuring the simulation: Defining Meteorological Data for Scenario
Under the REPORT tab, add any desired emission sources by filling out the form
Fill in an individual source name, site, height, diameter, temperature, vertical speed, emission time interval and specify the emitted species. The dispersed species is a tracer, and the emitted flow is fixed at 1mcg/m3.
You can enter the source location manually or by clicking on the location on the map to the right after clicking on the location field and the marker symbol.
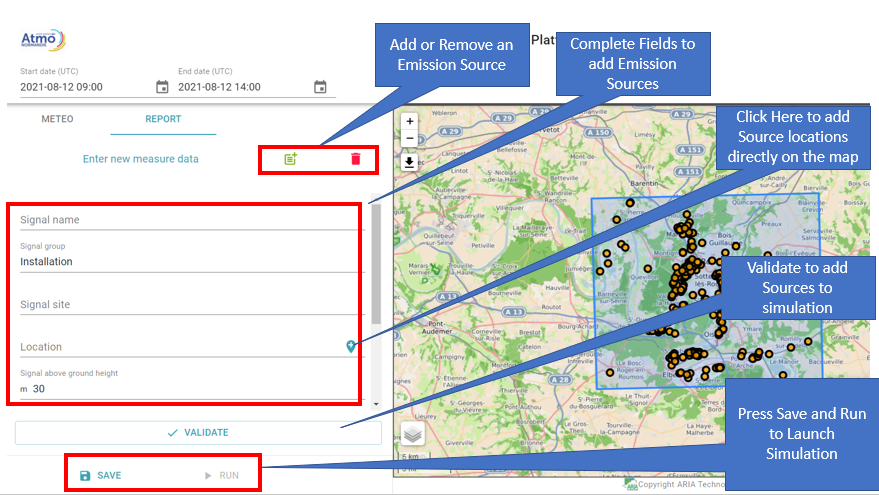
Configuring the simulation: Defining Emission Sources for Scenario
Pre-available sources are shown by yellow circles on the map to the right. To add one to the simulation, click on the source and then on ‘Add To Simulation’
Configuring the simulation:Adding a preivously available Emission source to the Scenario
Cartography of the retro-dispersion of pollutants
While creating your scenario, use model Retro Spray w/STE.
Under the METEO tab, choose the wind field simulation scenario you wish to use as data for your dispersion modelling.
At the top of the page, check the start and end dates for your simulation.
The map on the right should shift over to the area your scenario covers.
Configuring the simulation: Defining Meteorological Data for Scenario
Under the REPORT tab, add any desired emission sources by filling out the form
Fill in an individual source name, site, height, diameter, temperature, vertical speed, emission time interval and specify the emitted species. The user has the choice of the species and quantities emitted, but only one species is allowed.
You can enter the source location manually or by clicking on the location on the map to the right after clicking on the location field and the marker symbol.
Configuring the simulation: Defining Emission Sources for Scenario
Pre-available sources are shown by yellow circles on the map to the right. To add one to the simulation, click on the source and then on ‘Add To Simulation’
Configuring the simulation:Adding a preivously available Emission source to the Scenario